Getting started with Inventory
By the end of this tutorial, you will have opened the module, created a storage location, recognized your first item in the catalog and recorded a stock entry that the dashboard will show.
Prerequisites
- The Products and Inventory modules installed for your organization (see Activate modules)
- A profile carrying the
STOCKS.DASHBOARD.READ,STOCKS.WAREHOUSE.WRITEandSTOCKS.OPERATION.WRITEpermissions (see Permissions) - The main warehouse created at installation, with its main location and its three operation types — the module creates them for you, under their French names (Réceptions, Transferts internes, Livraisons). In an English session the dashboard shortcuts look for types named Receipts, Internal transfers and Deliveries, so rename the created types accordingly (see Configure operation types)
Steps
1. Open the module
From the dashboard of your organization, under My applications, click the Inventory card. The module opens on its Dashboard, or, if your profile does not open it, on the first screen it grants you.
The left menu gathers the six sections of the module: Dashboard, Items, Warehouses, Operations, Analysis and Settings. You only see there what your profile opens for you.
2. Choose the warehouse where you work
The top bar carries a Warehouse selector. Pick there the one where you store your goods: every screen of the module — the dashboard, the locations, the operations — speaks of that warehouse, and your choice is remembered for your next visits.
A single warehouse, no question asked
A brand-new organization only has the Main warehouse, created on installation. The selector then stays invisible: the module has nothing to ask you.
3. Discover the dashboard
The Dashboard first counts three indicators on the current warehouse: Tracked items, Below minimum and Out of stock. They cover the whole warehouse, not the page you are reading.
Then comes one card per stocked item: its total quantity, the breakdown by location, and the most severe alert those locations raise — Minimum reached, Safety reached or Maximum reached. The locations at zero are folded into one line that Show the empty locations unfolds.
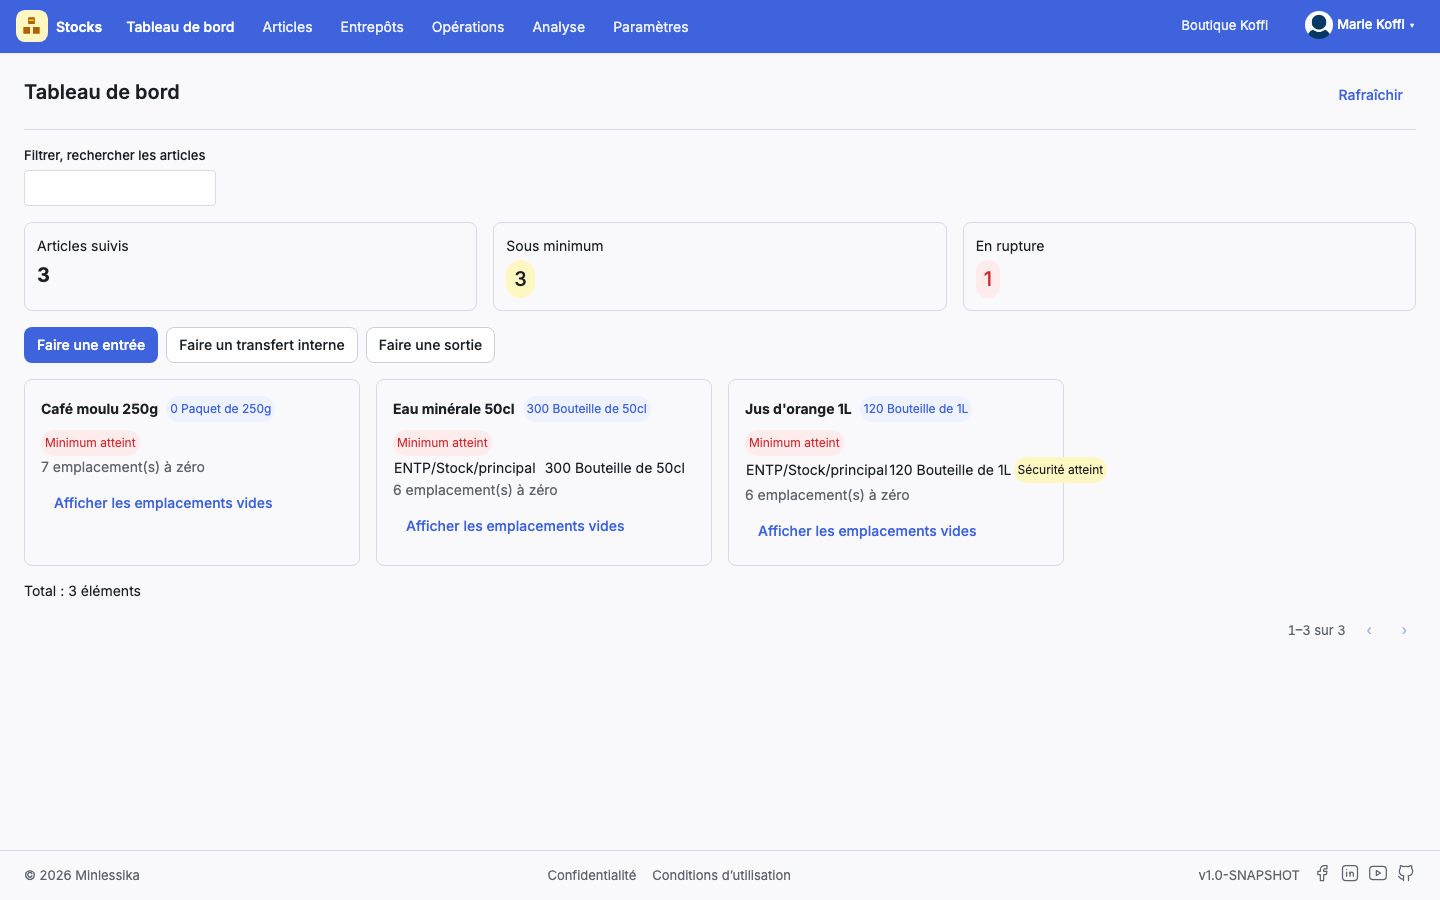
On a brand-new organization, the card is missing and the module shows "No item to show on the dashboard.": that is what the next steps will change.
4. Create a location
A warehouse without a location stores nothing. Open Warehouses › Locations: the list is the one of the current warehouse.
Click New location and fill in:
- the Full name — required, for example
Ground floor store room; - the Short name — required, for example
GF-STORE; - the Parent — leave No parent for a top-level location, or choose the one that contains it.
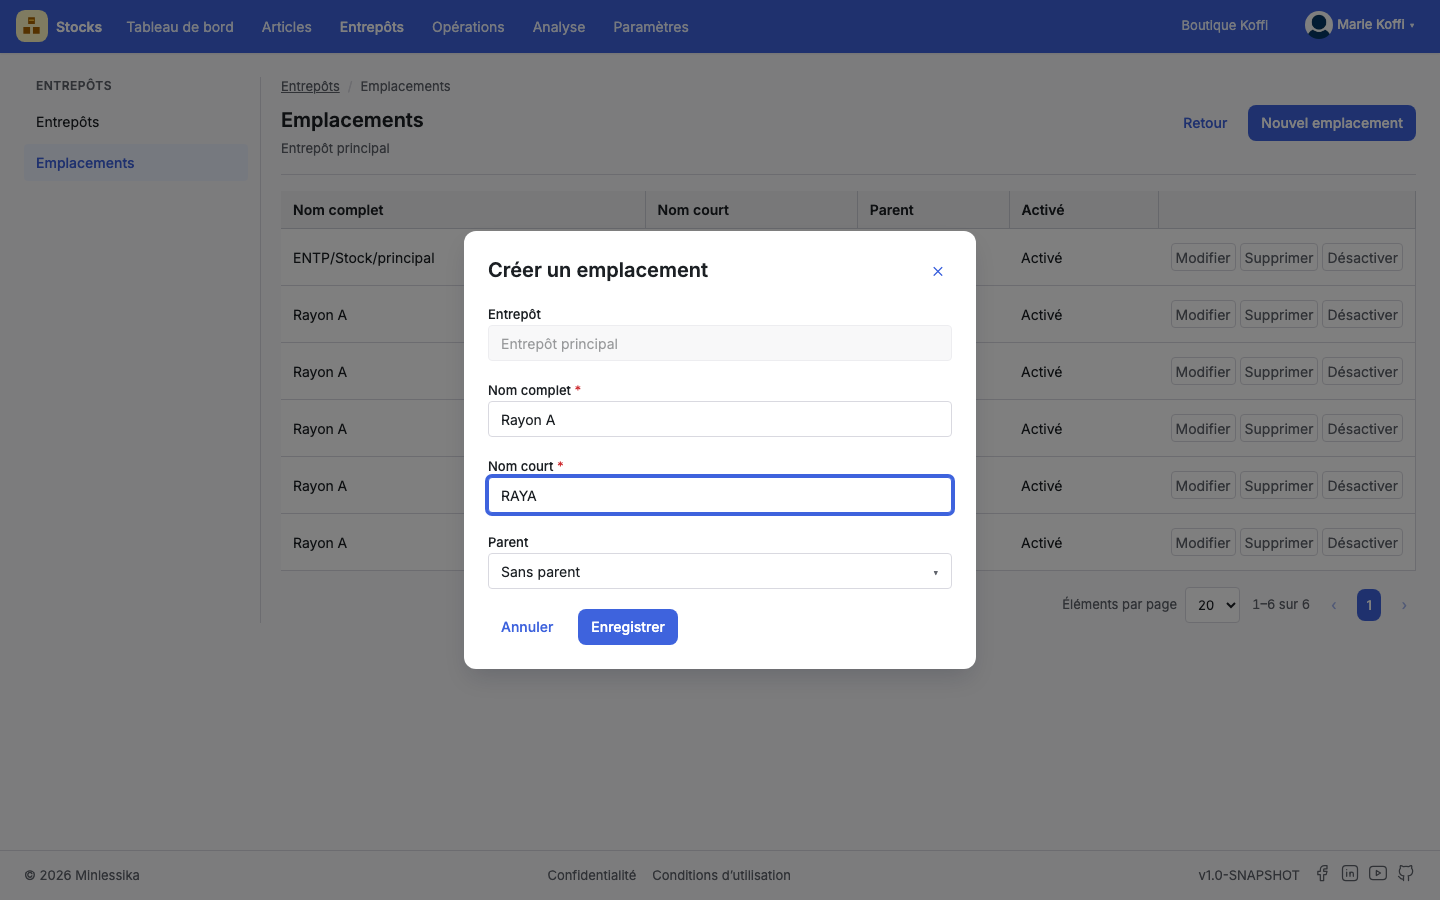
Confirm: the location joins the list, active. You will then be able to Edit it, Deactivate it or Delete it as long as no operation has taken place there.
A parent does not store
A location that contains others serves to organize, not to store: the module refuses to take it as the source or the destination of an operation. So create the storage locations at the finest level.
5. Recognize your item
The catalog belongs to the Products module: that is where you create a family, a subfamily, then the item itself, with at least its label, its internal reference and its packaging. The Inventory module refuses an item missing any of the three.
Declare that item as storable: only storable items cross the border between the two modules. Yours then shows up, with no further handling, under Items › Items of the Inventory module, with its Name, its Internal reference, its Barcode, its Packaging, its Costing method and its Subfamily.
The catalog is read here, it is kept elsewhere
The Items, Families and Subfamilies screens of the Inventory module are read-only. To fix a name or a subfamily, go back to the Products module: the fix flows down on its own.
View the record opens the item: its Last cost, its Current WAC, its Planning — the minimum, safety and maximum stocks per location — and its WAC history.
6. Record your first entry
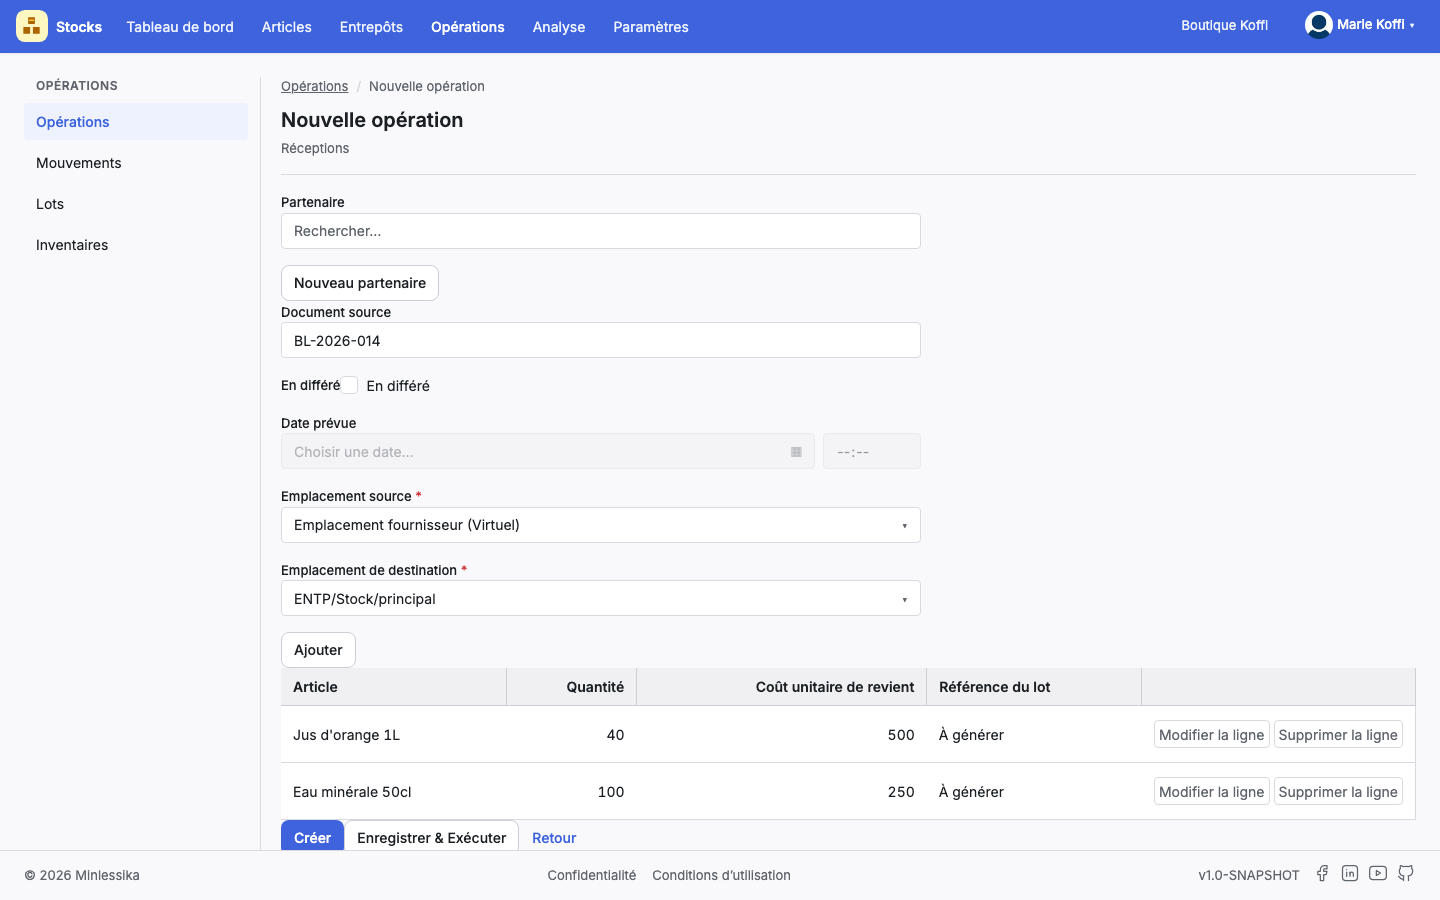
Go back to the Dashboard and click Record an entry. The module looks, in the current warehouse, for the operation type named Receipts and opens a New operation of that type.
Fill in the header:
- the Partner — the supplier delivering to you; New partner creates it without leaving the screen;
- the Source document — your delivery note, your invoice, your own reference;
- the Source location — the virtual supplier location, offered by default;
- the Destination location — the location created in step 4.
Then click Add and describe what you receive: the Item, the Quantity, the Unit cost price and, if you know it, the Batch reference. Left empty, it shows To be generated: the module will number the batch itself. Add as many lines as items received.
7. Validate, then execute
Click Create: the operation is recorded as a draft and gets its reference. Nothing has moved in stock yet.
Click Validate — the module asks you to confirm — then, once the operation is validated, Execute. It is this last action, and it alone, that writes the stock movements.
The shortcut of the regulars
Save & Execute clears the three steps at once. Keep it for the receipts you are sure of: an executed operation cannot be changed.
8. See your stock
Go back to the Dashboard: the card of your item announces its quantity, your location shows up in its breakdown, and the indicators have moved.
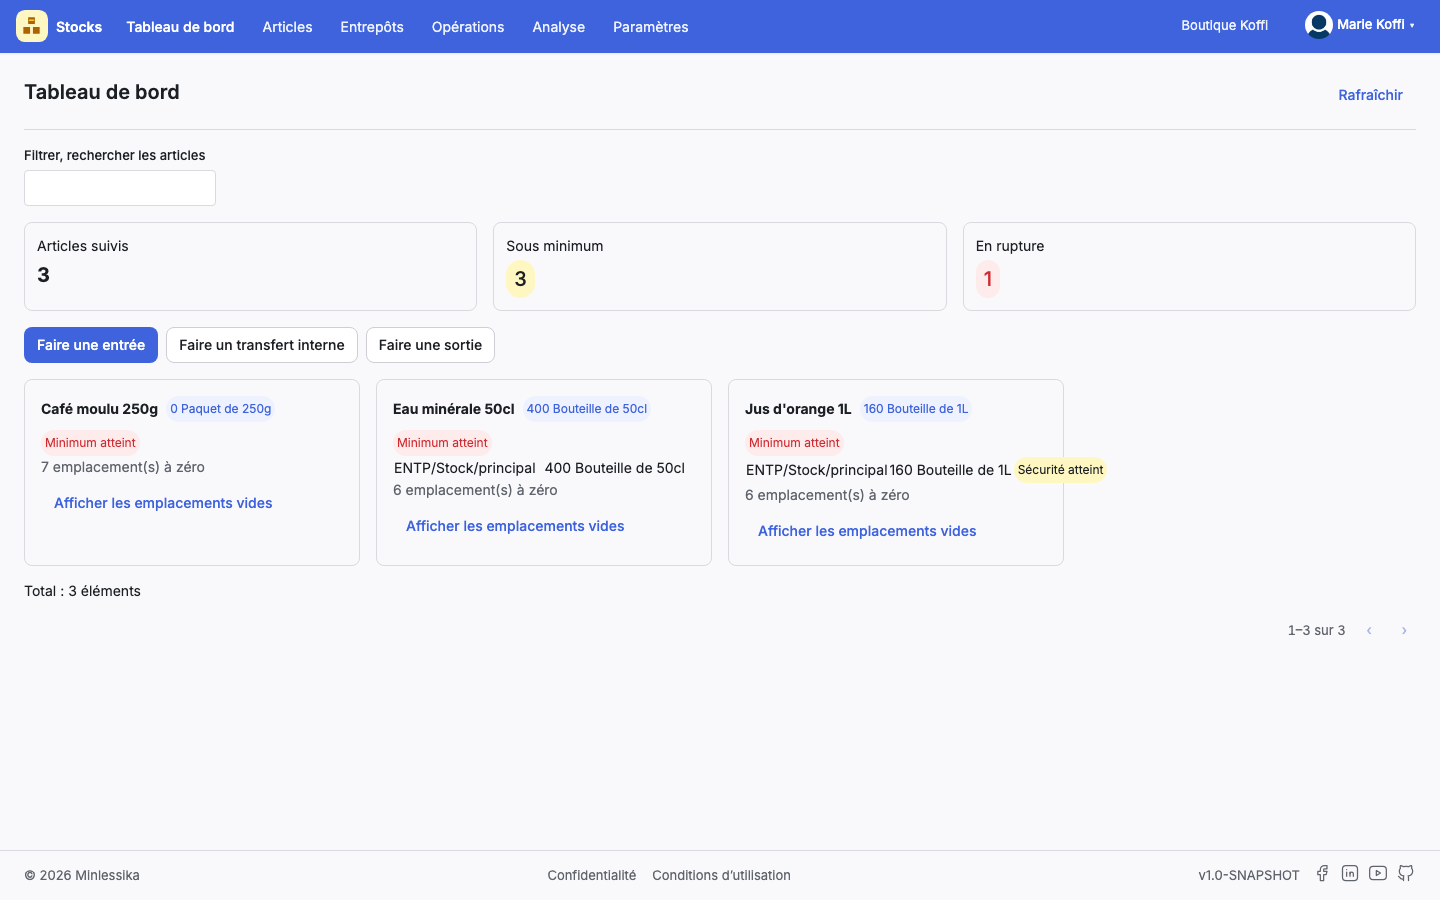
To read the same story in detail:
- Operations › Movements lists every movement, with its item, its quantity, its cost, its source location and its destination location;
- Operations › Batches shows the batch your entry has just opened, its Unit cost price, its Initial quantity and its Remaining quantity.
Going further
Changelog
- 1.2 (August 19, 2026): the operation types created at installation replace the prerequisite.
- 1.1 (August 19, 2026): screenshots added.
- 1.0 (August 18, 2026): document created.